As you may know the Raspberry Pi can only access your home network using a network cable. But lets face it, your Raspberry Pi project is not always going to be deployed close to a network outlet – so what do we do?
The best solution is to buy a cheap USB WiFi adapter and use one of the USB ports to access our wireless home network. Setting up a Raspberry Pi using the Raspbian OS to access your wireless network is easy – this guide will guide you through the process.
Prerequisites & Equipment
You are going to need the following:
- A Raspberry Pi (Buy here)
- A USB WiFi Adapter (I use the Edimax – Wireless USB adapter – its small and cheap!)
- Only required for older Raspberry Pi ‘s with no onboard WiFi
- A SD Card flashed with the Raspbian OS (Here is a guide if you need)
- Access to the Raspberry either via keyboard and a monitor or remotely
Before we proceed I want to point out the importance of buying the right USB WiFi Adapter. As you may have experienced with other types of hardware devices not all devices are plug-n-play. Sometimes you will need to download a driver to make them work. While drivers are normally readily available for Windows computers – it is a different world for Linux and Raspberry Pi’s. This is why it is very important to buy a WiFi Adapter that mentions “Linux” in the product description or package. I use the Edimax – Wireless USB adapter because I have found it to be cheap and very easy to work with. I very recommend you do the same – it could save you a lot of headaches.
Adding WiFi adapter to the Raspberry Pi
Plug the USB WiFi adapter into one of the free USB ports on the Raspberry Pi. Power up the Raspberry Pi – remember at this point the WiFi adapter does not work yet. You are still going to need some other means of being able to control the Raspberry Pi either via a keyboard or remotely using a wired network connection.
After booting and logging-in you want to make sure that the Raspberry Pi found your new wireless adapter. To look at which peripherals the operating system found when booting run the following command:
dmesg | more
You can use the spacebar to scroll down a page at a time – towards the end you will see something similar to the following lines:
[ 3.282651] usb 1-1.2: new high-speed USB device number 4 using dwc_otg
[ 3.394810] usb 1-1.2: New USB device found, idVendor=7392, idProduct=7811
[ 3.407489] usb 1-1.2: New USB device strings: Mfr=1, Product=2, SerialNumber=3
[ 3.420530] usb 1-1.2: Product: 802.11n WLAN Adapter
This means that the operating system recognized the USB WiFi Adapter using one of the built-in drivers (you can return to the terminal by pressing “q”). All that is left is to configure your WiFi connection.
Configuring the WiFi network
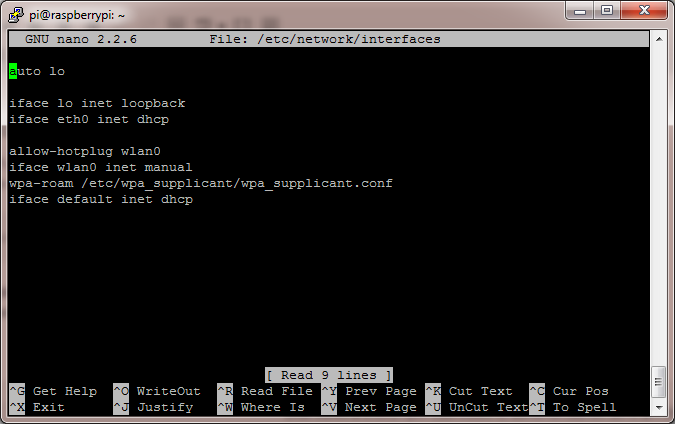
On the Raspberry Pi (and on Linux in general) you configure your network settings in the file “/etc/network/interfaces”. You can edit this file using the following command:
sudo nano /etc/network/interfaces
This will open the file in an editor called nano it is a very simple text editor that is easy to approach and use; even for users not familiar to a linux based operating systems just use the arrow keys.
After opening the file in nano you will see a screen like this:
auto lo
iface lo inet loopback
iface eth0 inet dhcp

allow-hotplug wlan0
auto wlan0

iface wlan0 inet dhcp
   wpa-ssid "Your Network SSID"
   wpa-psk "Your Password"
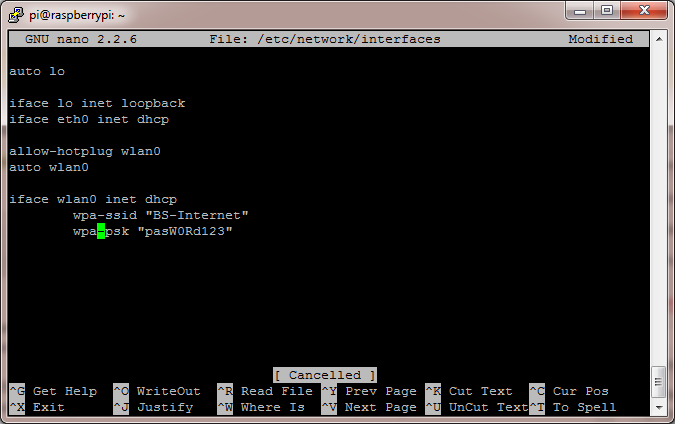
You will need to put your own SSID and password into the appropriate places. If you can’t remember your network name – just pull up your phone it will most like display the name in the settings or network settings screens.
After editing the file you should see something like the following:
To save the file press Ctrl+O this will write the file to the disk – afterwards you can exit nano by pressing Ctrl+X. If nano asks if you want to Save modified buffer? press “Y” followed by hitting enter to confirm the filename.
At this point everything is configured – all we need to do is reload the network interfaces. This can be done by running the following command (warning: if you are connected using a remote connection it will disconnect now):
sudo service networking reload
After reloading the network interface (and re-connecting to the pi if you are using a remote connection) – you can now check the status of our WiFi connection by running:
ifconfig
The result should look something like this:
wlan0 Link encap:Ethernet HWaddr 80:1f:02:aa:12:58
      inet addr:192.168.1.8 Bcast:192.168.1.255 Mask:255.255.255.0
      UP BROADCAST RUNNING MULTICAST MTU:1500 Metric:1
      RX packets:154 errors:0 dropped:173 overruns:0 frame:0
      TX packets:65 errors:0 dropped:0 overruns:0 carrier:0
      collisions:0 txqueuelen:1000
      RX bytes:32399 (31.6 KiB) TX bytes:13036 (12.7 KiB)
If you see a valid IP address under “inet addr” you can now disconnect the network cable, and enjoy your freedom to move your Raspberry Pi around – because the WiFi connection is up and running!
thx a lot !
I get the output after ifconfig
eth0 Link encap:Ethernet HWaddr b8:27:eb:ad:4b:bb
inet addr:192.168.2.102 Bcast:192.168.2.255 Mask:255.255.255.0
UP BROADCAST RUNNING MULTICAST MTU:1500 Metric:1
RX packets:14196 errors:4 dropped:4 overruns:0 frame:2
TX packets:5571 errors:0 dropped:0 overruns:0 carrier:0
collisions:0 txqueuelen:1000
RX bytes:1256364 (1.1 MiB) TX bytes:850017 (830.0 KiB)
I think the wireless adapter is not working. i have installed the driver for the adpater. serivce networking reload is working fine.
What should be the problem.
Since i have been using the hidden ssid i have coded:
auto lo
iface lo inet loopback
iface eth0 inet dhcp
auto wlan0
allow-hotplug wlan0
iface wlan0 inet dhcp
wpa-scan-ssid 1
wpa-ap-scan 1
wpa-key-mgmt WPA-PSK
wpa-proto RSN WPA
wpa-pairwise CCMP TKIP
wpa-group CCMP TKIP
wpa-ssid “My Secret SSID”
wpa-psk “My SSID PSK”
iface default inet dhcp
Please help
Thank you so much I have tried 17 different ways and yours is the only one that has worked!!!
Awesome! Worked first time. Thanks.
Thanks it works
I get operation not permitted and invalid argument. Please help!
Try sudo [Then add all the code in here without the brackets]
hello this is not working i follow all steps , after removing Ethernet cable rpi showing ip address , but when i opened browser that is not working
so can any one help me out in configuring wifi in my raspberrypi
i searched on many sites i tried all that but not finding solution
It doesn’t say :
[ 3.282651] usb 1-1.2: new high-speed USB device number 4 using dwc_otg
[ 3.394810] usb 1-1.2: New USB device found, idVendor=7392, idProduct=7811
[ 3.407489] usb 1-1.2: New USB device strings: Mfr=1, Product=2, SerialNumber=3
[ 3.420530] usb 1-1.2: Product: 802.11n WLAN Adapter