A great way to get started with electronics and the Raspberry Pi is hooking up a red LED and making it blink using a Python script. This tutorial will guide you through setting up the circuit, connecting it to the Raspberry Pi and how to write the Python script that makes the LED blink.
What you’ll need for this guide
We will need the following tools to complete the project:
- Raspberry Pi setup with monitor and USB Mouse & Keyboard
- Checkout this guide if you need help
- Solderless breadboard
- Jumper wires for easy hookup
- Resistor pack
- Red LED
- Multimeter (optional)
Setting up the circuit
The first step in this project is to design a simple LED circuit. Then we will make the LED circuit controllable from the Raspberry Pi by connecting the circuit to the general purpose input/output (GPIO) pins on the Raspberry Pi.
A simple LED circuit consists of a LED and resistor. The resistor is used to limit the current that is being drawn and is called a current limiting resistor. Without the resistor the LED would run at too high of a voltage, resulting in too much current being drawn which in turn would instantly burn the LED, and likely also the GPIO port on the Raspberry Pi.
To calculate the resistor value we need to examine the specifications of the LED. Specifically we need to find the forward voltage (VF) and the forward current (IF). A regular red LED has a forward voltage (VF) of 1.7V and forward current of 20mA (IF). Additionally we need to know the output voltage of the Raspberry Pi which is 3.3V.
We can then calculate the resistor size needed to limit the current to the LED’s maximum forward current (IF) using ohm’s law like this:
\[ R_\Omega = \frac {V} {I} = \frac {3.3 – VF} {IF} = \frac {3.3 – 1.7} {20 mA} = 80 \Omega \]
Unfortunately 80 ohm is not a standard size of a resistor. To solve this we can either combine multiple resistors, or round up to a standard size. In this case we would round up to 100 ohm.
Important information: Since ohm’s law tells us that I (current) = V (voltage) / R (ohm) rounding up the resistor value will lower the actual current being drawn a little. This is good because we don’t want to run our system at the maximum current rating. Rounding down instead of up would be dangerous, since it will actually increase the current being drawn. Increased current would result in running our system over the maximum rating and potentially destroying or damaging our components.
With the value calculated for the current limiting resistor we can now hook the LED and resistor up to GPIO pin 8 on the Raspberry Pi. The resistor and LED needs to be in series like the diagram below. To find the right resistor use the resistor color code – for a 100 ohm resistor it needs to be brown-black-brown. You can use your multimeter to double check the resistor value.
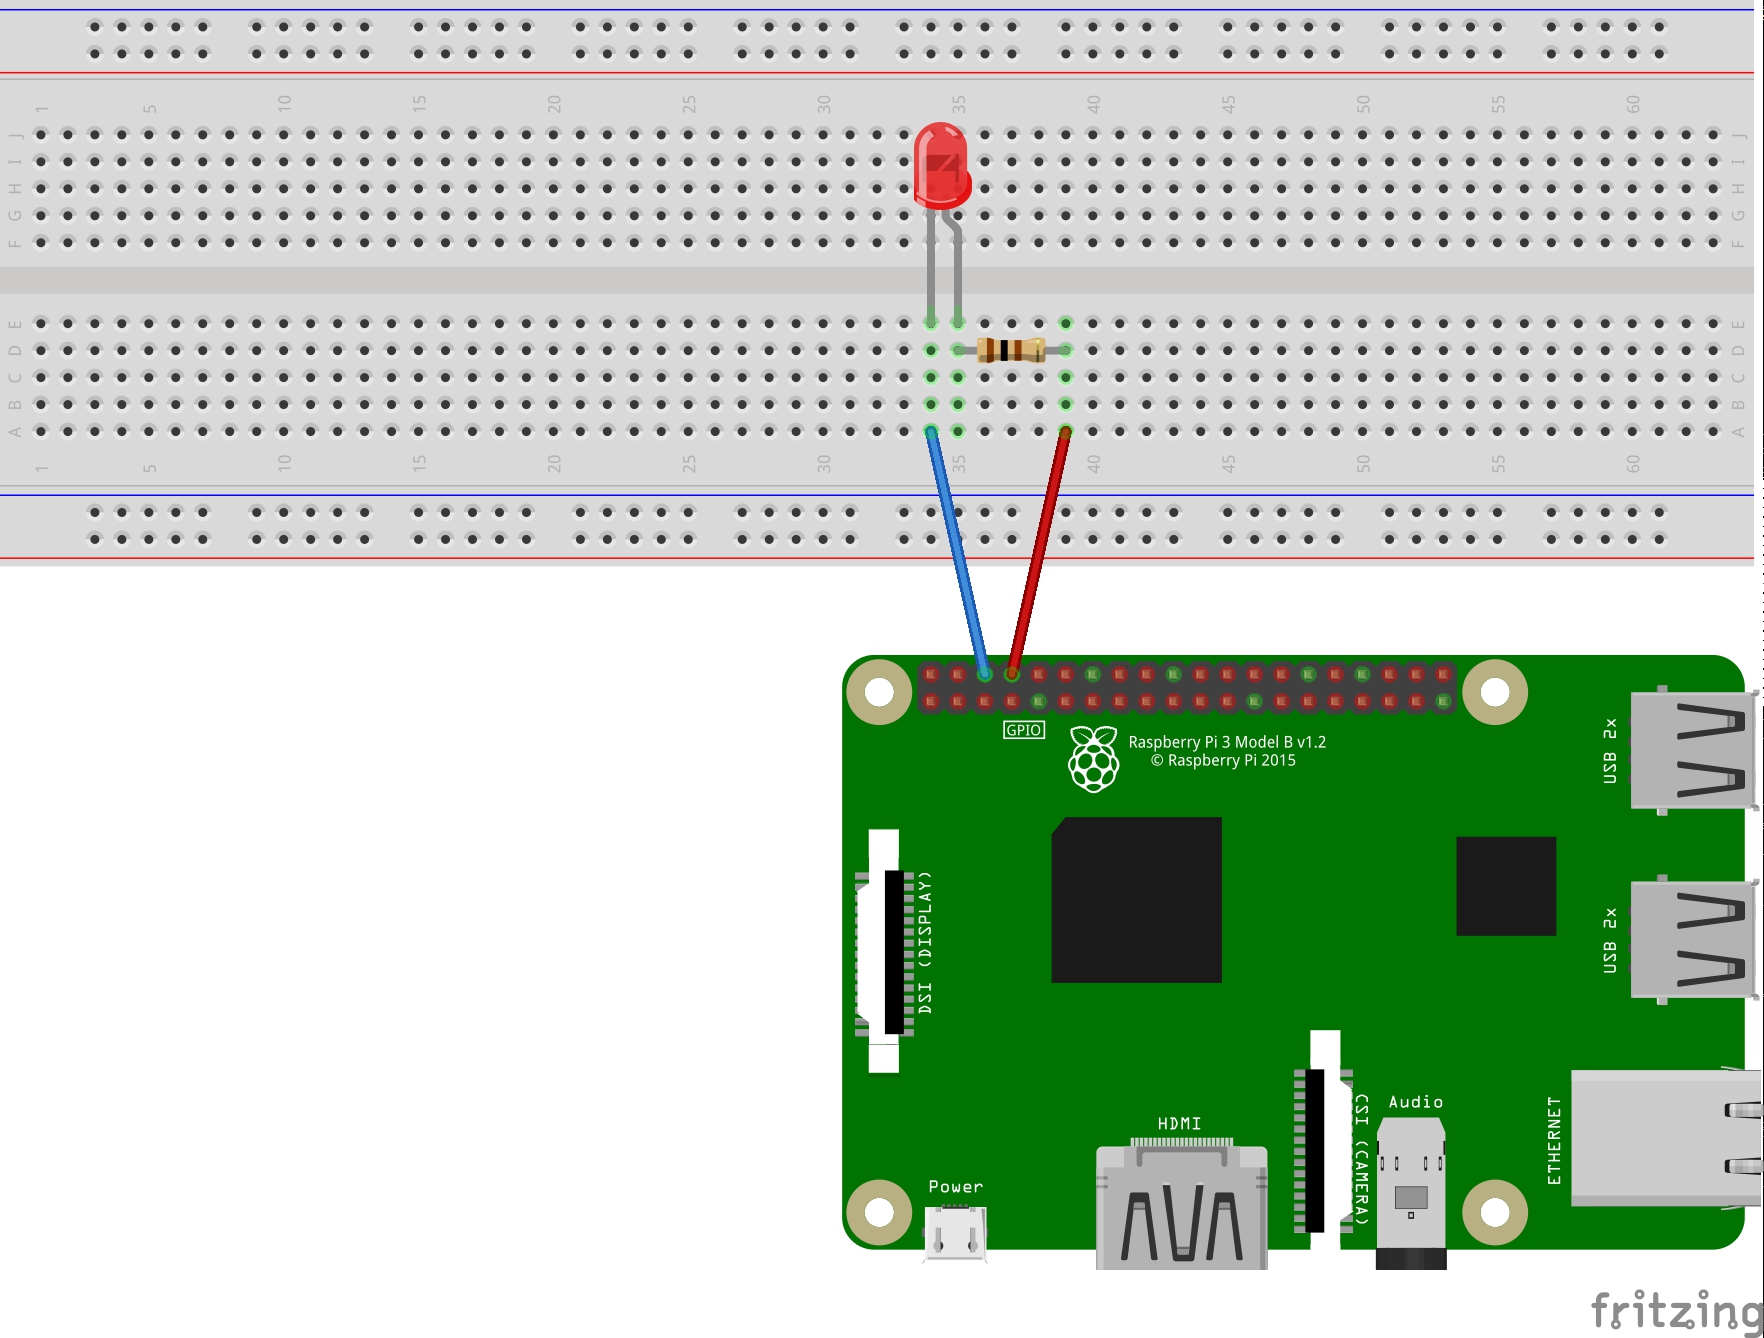
When hooking up the circuit note the polarity of the LED. You will notice that the LED has a long and short lead. The long lead is the positive side also called the anode, the short lead is the negative side called the cathode. The long should be connected to the resistor and the short lead should be connected to ground via the blue jumper wire and pin 6 on the Raspberry Pi as shown on the diagram.
To find the pin number refer to this diagram showing the physical pin numbers on the Raspberry Pi.
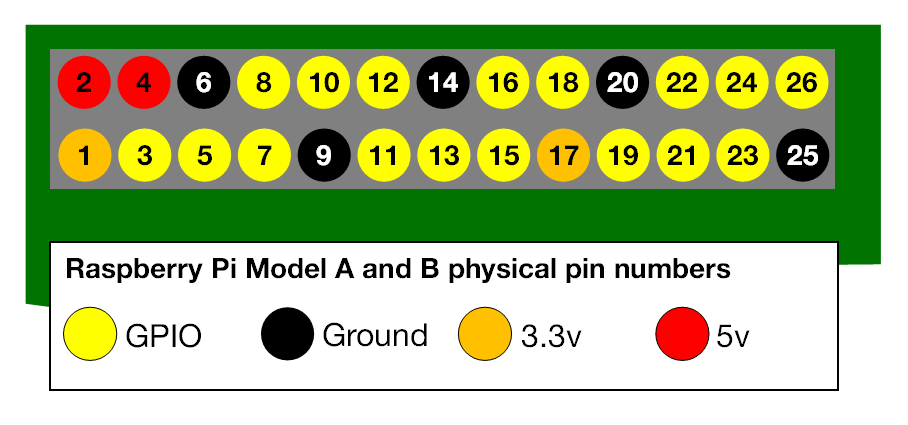
Writing the Python Software to blink the LED
With the circuit created we need to write the Python script to blink the LED. Before we start writing the software we first need to install the Raspberry Pi GPIO Python module. This is a library that allows us to access the GPIO port directly from Python.
To install the Python library open a terminal and execute the following
$ sudo apt-get install python-rpi.gpio python3-rpi.gpio
With the library installed now open your favorite Python IDE (I recommend Thonny Python IDE more information about using it here).
Our script needs to do the following:
- Initialize the GPIO ports
- Turn the LED on and off in 1 second intervals
To initialize the GPIO ports on the Raspberry Pi we need to first import the Python library, the initialize the library and setup pin 8 as an output pin.
import RPi.GPIO as GPIO    # Import Raspberry Pi GPIO library
from time import sleep     # Import the sleep function from the time module

GPIO.setwarnings(False)    # Ignore warning for now
GPIO.setmode(GPIO.BOARD)   # Use physical pin numbering
GPIO.setup(8, GPIO.OUT, initial=GPIO.LOW)   # Set pin 8 to be an output pin and set initial value to low (off)
Next we need to turn the LED on and off in 1 second intervals by setting the output pin to either high (on) or low (off). We do this inside a infinite loop so our program keep executing until we manually stop it.
while True: # Run forever
    GPIO.output(8, GPIO.HIGH) # Turn on
    sleep(1)                  # Sleep for 1 second
    GPIO.output(8, GPIO.LOW)  # Turn off
    sleep(1)                  # Sleep for 1 second
Combining the initialization and the blink code should give you the following full Python program:
import RPi.GPIO as GPIO # Import Raspberry Pi GPIO library
from time import sleep # Import the sleep function from the time module

GPIO.setwarnings(False) # Ignore warning for now
GPIO.setmode(GPIO.BOARD) # Use physical pin numbering
GPIO.setup(8, GPIO.OUT, initial=GPIO.LOW) # Set pin 8 to be an output pin and set initial value to low (off)

while True: # Run forever
 GPIO.output(8, GPIO.HIGH) # Turn on
 sleep(1) # Sleep for 1 second
 GPIO.output(8, GPIO.LOW) # Turn off
 sleep(1) # Sleep for 1 second
With our program finished, save it as blinking_led.py and run it either inside your IDE or in the console with:
$ python blinking_led.py
With the program running you should see something like this:
You’ll notice the program keeps on running because of the infinite loop. To stop it click either stop in your IDE or Ctrl+C if you run it inside the console.
Is the LED not blinking? If the LED diode is not blinking try turning it around, maybe you got the polarity wrong (this is perfectly safe).
This guide showed you how to setup a LED to blink using the Raspberry Pi and the Python programming language. For more tips and guides on using electronics with the Raspberry Pi checkout the electronics section and join our newsletter!