Once you have received your Raspberry Pi and unpacked the mini-computer it is time to fire it up and see what its all about. However much like a normal desktop computer wont boot without a operating system (such as Windows) neither will the raspberry. This guide will show you how to pick a operating system, flash it to a SD card and boot your Raspberry Pi for the first time.
To complete this project you’re gonna need:
- Raspberry Pi (Buy here)
- SD Card (Buy here)
- A computer with an internet connection and a SD card reader
- And some of the other accessories described here (keyboard, mouse, monitor etc.)
Selecting a Operating System (OS)
Since the Raspberry Pi is powered by a so-called ARM processor it cannot run the same operating system as your computer. Instead it must run one of the operating systems that have been optimized and ported to the Raspbery Pi ARM hardware architecture. There are a few different operating systems available as listed here. It is important to note that most of them are based on the linux kernel and that it is not possible to run windows on the Raspberry Pi.
Raspbian “Wheezy”
The Raspbian “Wheezy” operating system is the standard operating system to run on the Raspberry Pi. It has very good integration with the hardware and comes pre-loaded with a graphical user interface and development tools. This will come in very handy if you are not too experienced in a linux enviornment.
Soft-float Debian “wheezy”
The soft-float debian operating system is used primarily if you are running intensive java based applications on your Raspberry Pi (We wont be doing that for now).
Arch Linux ARM
This operating system is not for beginners so we wont talk more about it just now.
Our favorite is the Raspbian operating system since it is pretty easy to get started with. To continue this guide, download the latest version of the Raspbian “Wheezy” operating system image here (scroll down to “Raw Images”).
Once you have downloaded and move the file to an appropriate folder right click and select “Extract All…” – this will extract the image file from the downloaded zip file.
Other Tools
In addition to the operating system we are also going to need a program that can transfer the operating system to our SD card in such a way that the Raspberry Pi can use it to boot from. This program is called Win32DiskImager and is available here for free.
Starting Win32DiskImager
Once you have downloaded the Win32DiskImager file – move it to an appropriate folder, right-click and select “Extract All…” follow the guide to extract the program.
The program does not need to be installed – you can start it now by double clicking the file “Win32DiskImager”. Before starting plug the empty SD card into your computer.
Once started you will have to select the Rasbian “Wheezy” image file, next select the drive letter of your SD card. My configuration looks as follows:
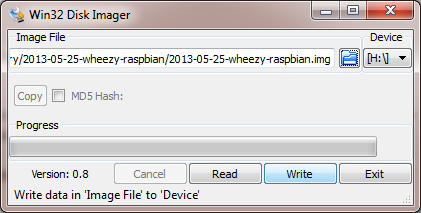
NOTE: Its important that you are 100% sure that the drive letter selected is your SD card.
Now press “Write” and sit back and relax while the program installs the operating system onto your SD card. While waiting you can connect the Raspberry Pi to a USB Keyboard & Mouse and a HDMI monitor or TV.
First boot
Once we have programmed the SD Card – plug it into the Raspberry Pi, your should now have a configuration looking like this:
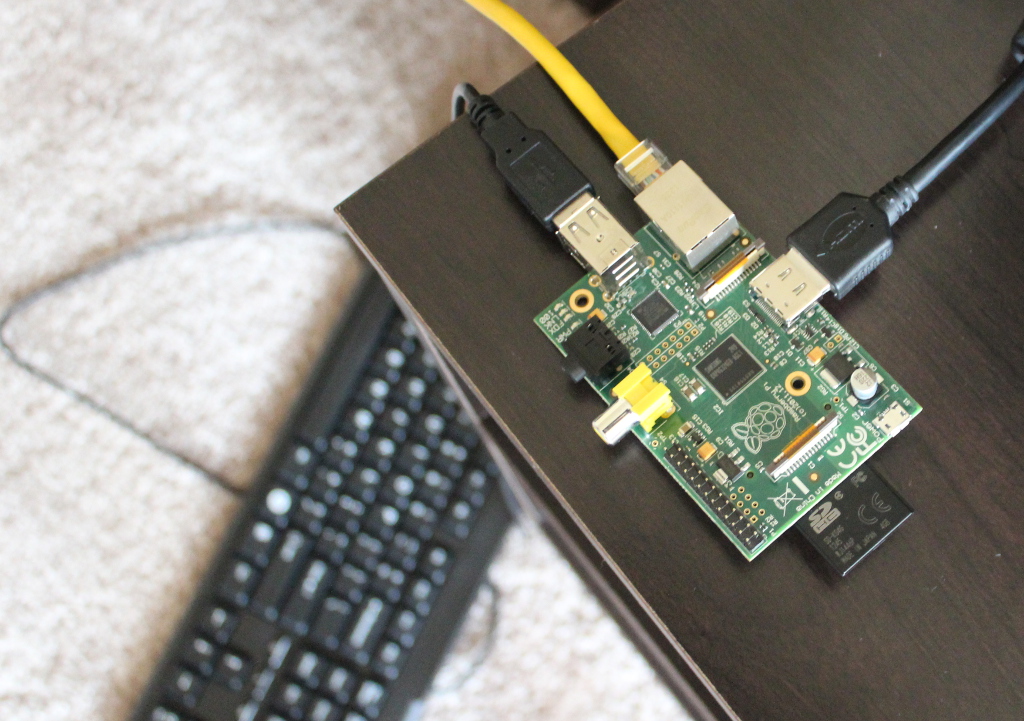
Connect power and you should see the boot sequence on your TV (if not check if you selected correct HDMI input on TV). After first boot the Raspberry Pi boots up in setup mode. If it does not boot into setup mode you can type the following command to get there:
sudo raspi-config
When in setup mode we want to:
- Re-size to file-system to use the entire SD card in my case (4GB)
- First option in setup menu
- Change the locale to match your location
- This is found under “Internationalization Options”
- Change the timezone to match your location
- This is found under “Internationalization Options”
For more details on how this is done in the setup menu watch this video:
We can now reboot the Raspberry Pi – and when it boots again it will come up with our new configuration! To log in use the following credentials:
User: pi
Password: raspberry
Your Raspberry is now setup, configured and ready for you to use for any purpose you want.
If you need any inspiration for what to do with your pi – visit our Raspberry Pi Projects section.

1 Comment
Raspberry Pi | Pearltrees · April 28, 2014 at 10:42 am
[…] Installing OS […]
Comments are closed.