Smart Home devices are becoming more and more popular, but the price of a commercial Smart Home Hub can often be steep and often comes with a monthly fee attached to it. There is however a much cheaper alternative to buying an expensive commercial hub – making your own using a Raspberry Pi.
This guide will walk you through setting up a Smart Home Hub using the open source Home Assistant platform. The Home Assistant platform is a fully featured home automation hub that integrates with a myriad of Smart Home technologies. This guide assumes we will be controlling Z-Wave Smart Home devices. Z-Wave is a open home automation standard with over a 1000 different certified slave devices available – everything from light dimmers over thermostats to door locks. In this guide will show you how to setup a light dimmer, but you can easily add new devices to the hub once it is configured. This includes devices using many other Smart Home technologies such as NEST, WeMo, Philips Hue, Wink, Ecobee and many more.
Prerequisites
To get started we need the following:
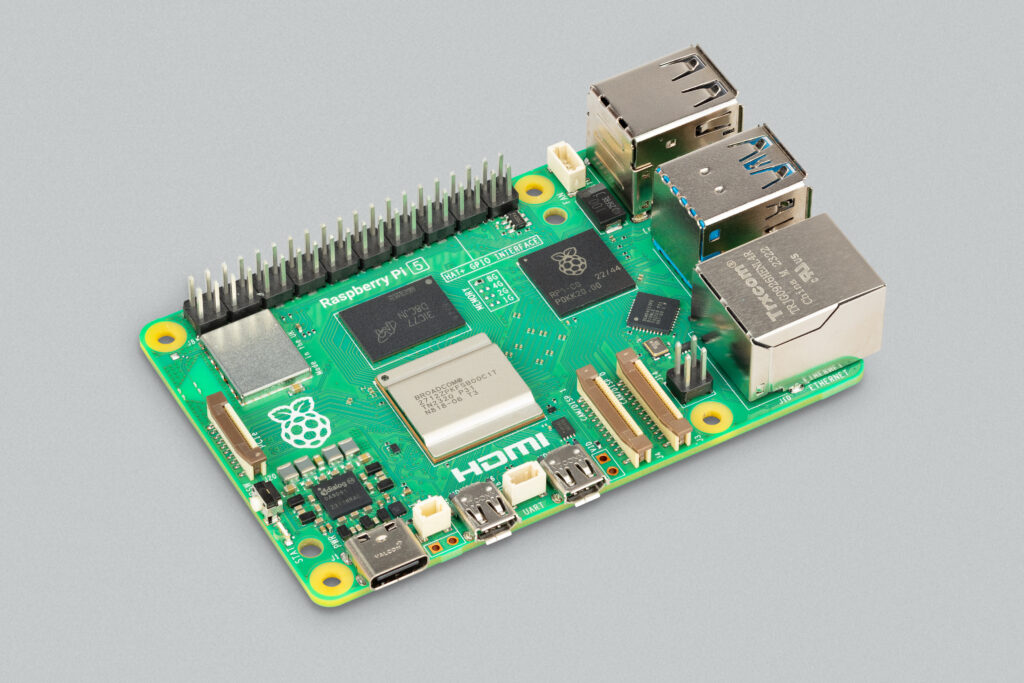
- Raspberry Pi 3 or Raspberry Pi 4
- Micro SD Card
- HDMI cable
- Computer monitor
- USB Keyboard and Mouse
- 5V Power supply
- Z-Wave USB Dongle – I recommend using the Z-Stick Gen5 from AeoTec
- Z-Wave Slave devices to control, here are some examples (you’ll just need one to get started):
Before we start please note this project will take 4-8 hours to complete. Be sure to give yourself enough time to setup this project.
Downloading and Flashing Raspbian
There are a couple of ways to setup Home Assistant on a Raspberry Pi, the simplest approach is to use a fresh installation of the Raspbian distribution and then applying the Home Assistant All-In-One Installer.
Download the latest Raspbian version from here: https://www.raspberrypi.org/downloads/raspbian/, I recommend using Raspbian Lite since we will use a browser interface for our Raspberry Pi Smart Home hub and not a monitor connected to the Raspberry Pi as our main interface.
When downloaded extract and flash the image onto a SD card using Win32DiskImager as described here.
First Boot
Before booting the Raspberry Pi with our newly flashed SD card, we connect it to our Z-Wave USB dongle, HDMI monitor (or TV), mouse and keyboard, and the WiFi dongle if you’re not using the Raspberry Bi 3.
The first boot sequence will take approximately 5 minutes because the system will re-size the file system and do other initial setup tasks.
After the first boot you will see the Raspberry Pi terminal login screen.
Login to your Raspberry Pi using the following credentials:
Username: pi
Password: raspberry
Setup WiFi and internet connection
Once logged it lets connect the Raspberry Pi to a WiFi network and the internet.
Follow the steps in this guide to setup WiFi: How To: Connect your Raspberry Pi to WiFi
Alternatively you can also connect your Raspberry Pi to your router using a network cable.
Installing Home Assistant
In our next step we will install home assistant using the all-in-one installer. This step can be executed on the Raspberry Pi using a keyboard connected to the Pi or remotely by SSH’ing into the Pi as described here: Working with a Raspberry Pi from another computer.
Login to your Raspberry Pi using the following credentials:
Username: pi
Password: raspberry
Start the installation by running the following command:
$ wget -Nnv https://raw.githubusercontent.com/home-assistant/fabric-home-assistant/master/hass_rpi_installer.sh && bash hass_rpi_installer.sh
This command is a one line command and should be executed as the “pi” user.
This installation will take a couple of hours depending on the version of your Rapsberry Pi. It will go through the entire process of setting up service accounts, installing the necessary dependencies as well as installing home assistant. The beauty of the all-in-one installer is that it not only installs home assistant but also the extra open Z-Wave drivers.
Once the installation process has finished go ahead and reboot the raspberry with:
$ sudo reboot
Once its rebooted login again and wait for Home Assistant to boot up. This can take a while since its now installing python dependencies for the home assistant components you’re using. Give it 10-15 minutes and try to access the home assistant interface on <ip address of Raspberry Pi>:8123 – for my Raspberry its: http://192.168.1.216:8123/.
If you cannot access the interface please refer to the toubleshooting section below.
With Home Assistant installed its now time to configure our Raspberry Pi Smart Home router.
Configuring the Z-Wave component and your USB stick
The last step of enabling the Z-Wave component for Home Assistant is configuring the component and telling home assistant where to find the Z-Wave USB stick.
First find the Z-Wave USB device, on your Raspberry Pi you can list the USB devices using the following command:
$ ls /dev/ttyACM*
If you have more than one device and you don’t know which one is the Z-Wave USB stick you can either try one at a time or unplug all other USB device and list the USB devices again.
Next open the home assistant configuration file in nano:
$ sudo nano /home/hass/.homeassistant/configuration.yaml
At the end of the file add the following to enable Z-Wave functionality:
# Example configuration.yaml entry
zwave:
   usb_path: /dev/ttyACM0
Exit nano by pressing Ctrl+X followed by Y, and restart the home assistant service with:
$ sudo systemctl restart home-assistant.service
After restarting Home Assistant access your Home Assistant interface on: <ip address of Raspberry Pi>:8123 (it might take a minute or two to come up).
To check that the Z-Wave component is active go to services in the “Developer Tools” section and check that Z-Wave is in the domain drop down like this:

This shows how to verify that the Z-Wave service is running in home assistant.
Add Z-Wave device to network
This part of the guide only applies if you’re using the Z-Stick Gen5 Z-Wave USB dongle.
Put your Z-Stick into inclusion mode by pressing the action button once, the LED ring should start pulsing blue, then press the inclusion button on the Z-Wave slave device you’re trying to include. After inclusion the LED ring should light up solid blue. After a few seconds the LED ring will start pulsing blue again – install additional devices or press the action button once to leave inclusion mode.
If you’re having trouble including your Z-Wave device refer to the Z-Wave trouble shooting section.
Insert the USB stick back into the Raspberry Pi and access the home assistant interface.
If the interface is not coming up try to restart the service to allow it to recognize the USB stick again:
$ sudo systemctl restart home-assistant.service
Control your devices
Access your Home Assistant interface on: <ip address of Raspberry Pi>:8123 (it might take a minute or two to come up).
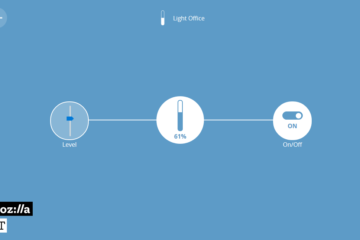
Your new Z-Wave device(s) should now be automatically discovered and you can control your device in your web interface like this:
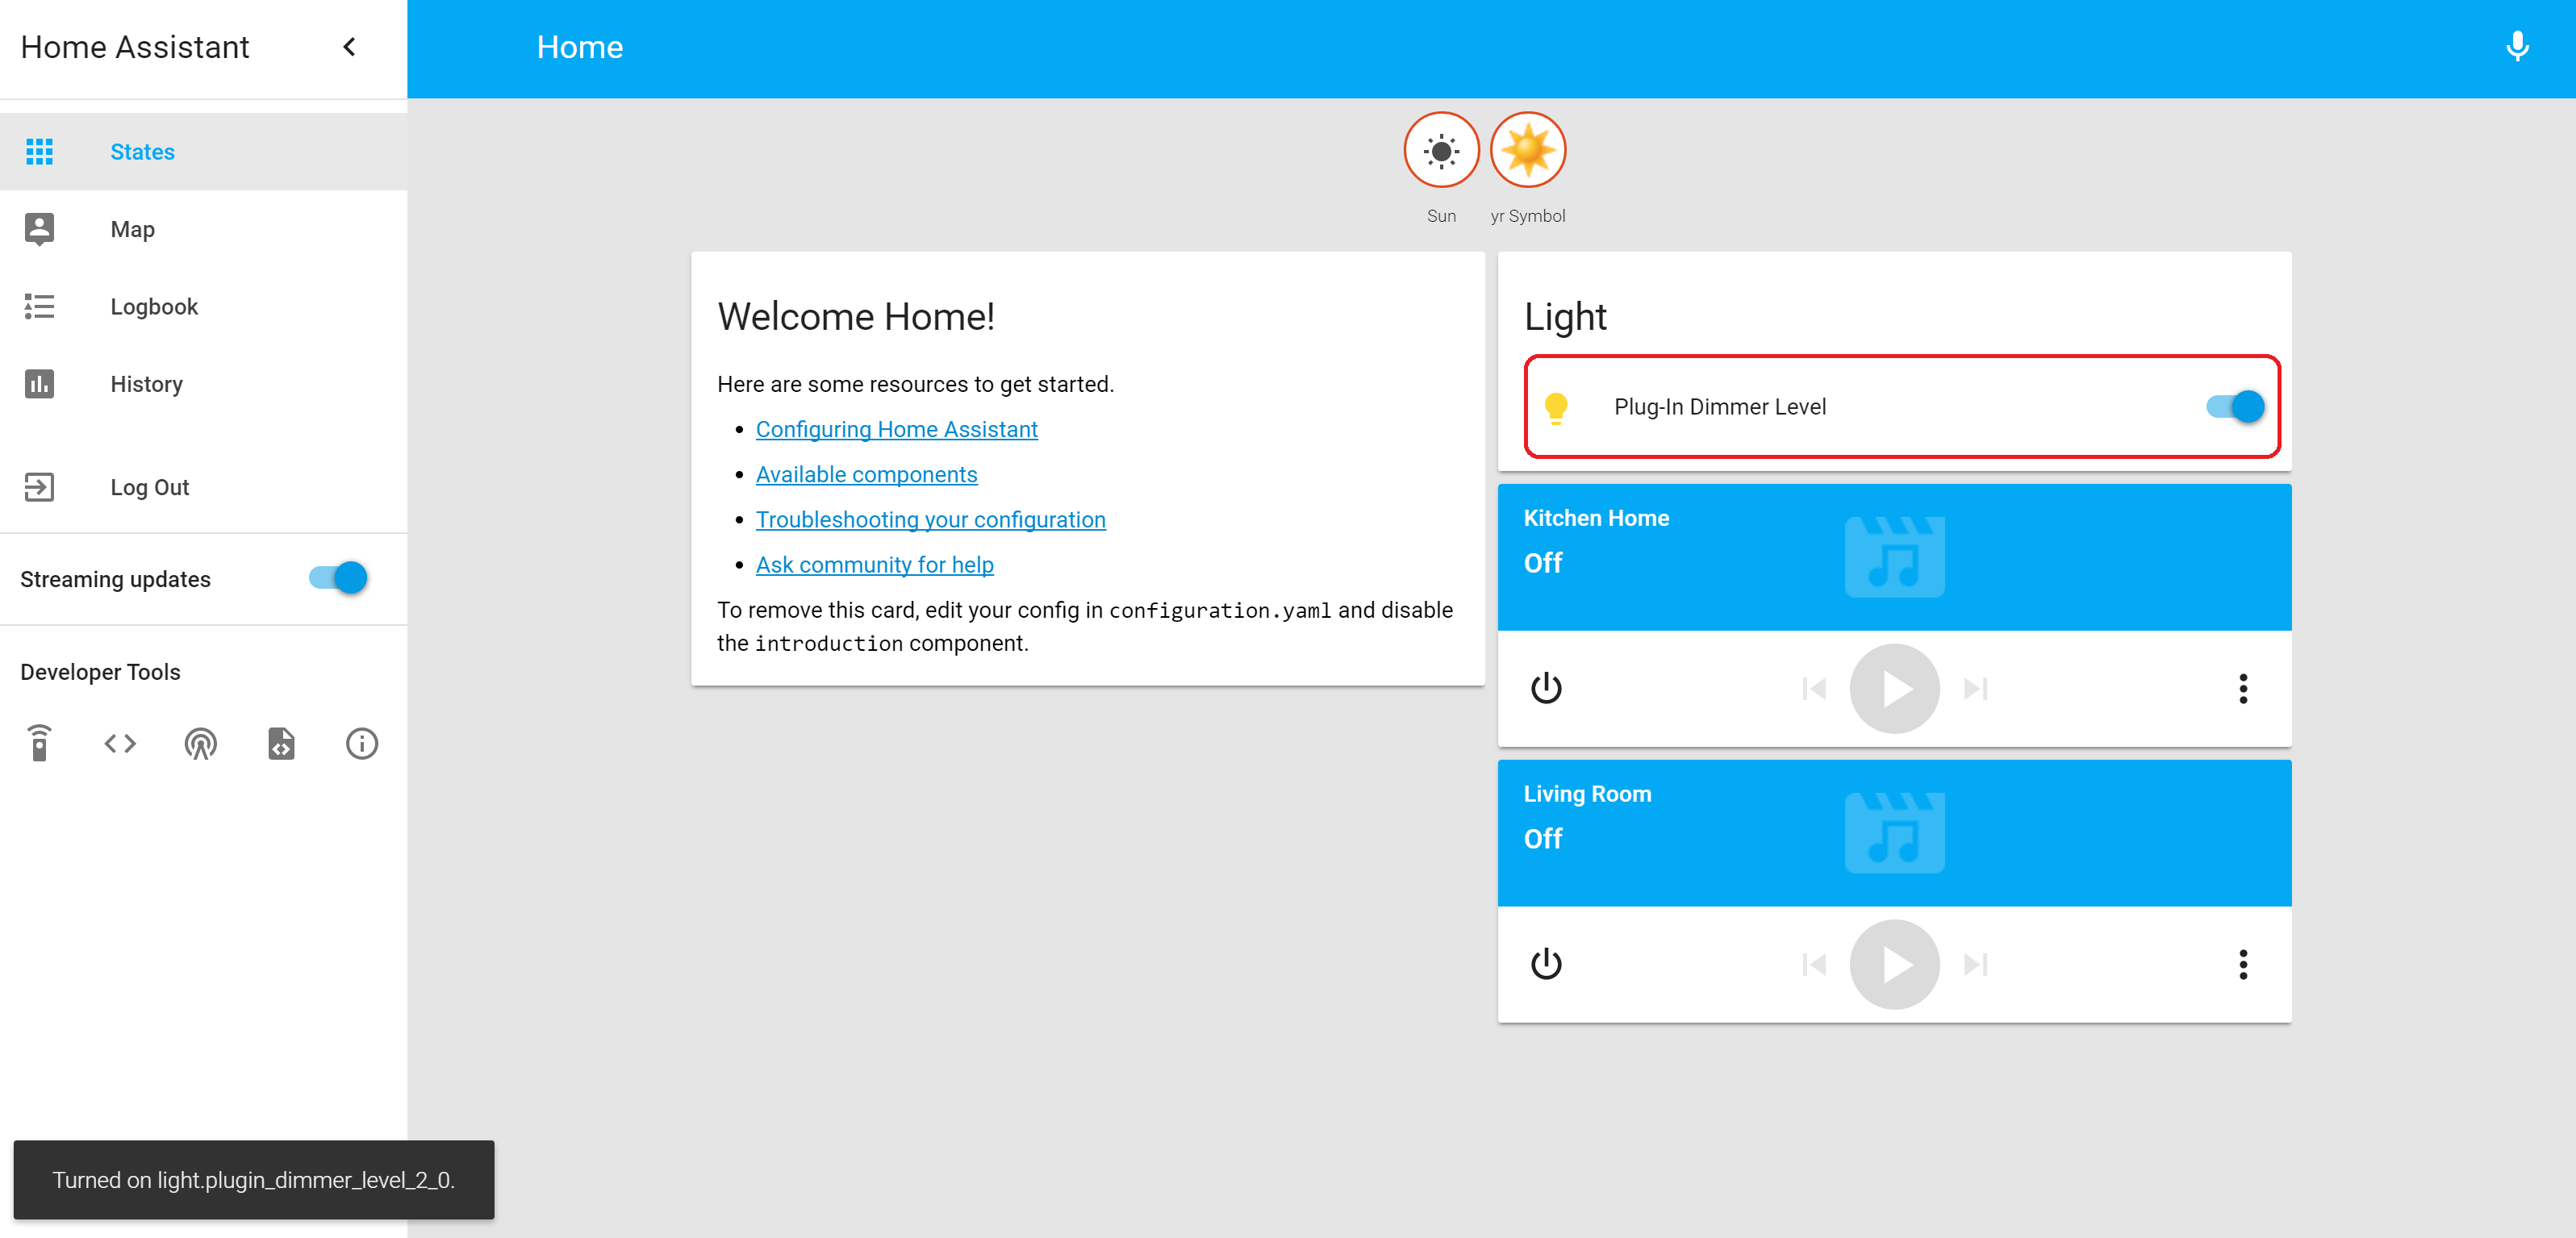
Your Z-Wave home automation router using Home Assistant and the Raspberry Pi is now configured and ready to use.
Next steps …
With you smart home router setup you can now make it even more useful following the guides below:
- How to access your Raspberry Pi Home Assistant Smart Home Hub from outside your home
- Configure schedule and timers for your lights – coming soon
- Add additional components to your home assistant installation – coming soon
- Integrate with Google Home – coming soon
Troubleshooting
If you cannot access your Home Assistant interface on http://ip-of-the-raspberry-pi:8123 try the following.
Run the command to start Home Assistant:
$ sudo systemctl start home-assistant.service
If you still cannot access the interface – check the log files using:
$ tail /var/log/syslog -n 100
Try match the output of the log file with any of the issues below:
Re-install setuptools
If you see a error like this:
hass[15005]: INFO:homeassistant.core:Bus:Handling <Event component_loaded[L]: component=introduction>
hass[15005]: Config directory: /home/homeassistant/.homeassistant
hass[15005]: Traceback (most recent call last):
hass[15005]: File "/srv/homeassistant/bin/hass", line 11, in <module>
hass[15005]: sys.exit(main())
hass[15005]: File "/srv/homeassistant/lib/python3.4/site-packages/homeassistant/__main__.py", line 380, in main
hass[15005]: exit_code = setup_and_run_hass(config_dir, args)
hass[15005]: File "/srv/homeassistant/lib/python3.4/site-packages/homeassistant/__main__.py", line 293, in setup_and_run_hass
hass[15005]: log_rotate_days=args.log_rotate_days)
hass[15005]: File "/srv/homeassistant/lib/python3.4/site-packages/homeassistant/bootstrap.py", line 457, in from_config_file
hass[15005]:hass.loop.run_until_complete(future)
hass[15005]: File "/usr/lib/python3.4/asyncio/base_events.py", line 276, in run_until_complete
hass[15005]: return future.result()
hass[15005]: File "/usr/lib/python3.4/asyncio/futures.py", line 277, in result
hass[15005]: raise self._exception
hass[15005]: File "/srv/homeassistant/lib/python3.4/site-packages/homeassistant/bootstrap.py", line 448, in _async_init_from_config_file
hass[15005]: config_path,hass, verbose, skip_pip, log_rotate_days)
hass[15005]: File "/srv/homeassistant/lib/python3.4/site-packages/homeassistant/bootstrap.py", line 490, in async_from_config_file
hass[15005]: config_dict,hass, enable_log=False, skip_pip=skip_pip)
hass[15005]: File "/srv/homeassistant/lib/python3.4/site-packages/homeassistant/bootstrap.py", line 426, in async_from_config_dict
hass[15005]: yield from _async_setup_component(hass, domain, config)
hass[15005]: File "/srv/homeassistant/lib/python3.4/site-packages/homeassistant/bootstrap.py", line 132, in _async_setup_component
hass[15005]: config = yield from async_prepare_setup_component(hass, config, domain)
hass[15005]: File "/srv/homeassistant/lib/python3.4/site-packages/homeassistant/bootstrap.py", line 264, in async_prepare_setup_component
hass[15005]: None, _handle_requirements,hass, component, domain)
hass[15005]: File "/usr/lib/python3.4/asyncio/futures.py", line 388, in __iter__
hass[15005]: yield self # This tells Task to wait for completion.
hass[15005]: File "/usr/lib/python3.4/asyncio/tasks.py", line 286, in _wakeup
hass[15005]: value = future.result()
hass[15005]: File "/usr/lib/python3.4/asyncio/futures.py", line 277, in result
hass[15005]: raise self._exception
hass[15005]: File "/usr/lib/python3.4/concurrent/futures/thread.py", line 54, in run
hass[15005]: result = self.fn(*self.args, **self.kwargs)
hass[15005]: File "/srv/homeassistant/lib/python3.4/site-packages/homeassistant/bootstrap.py", line 89, in _handle_requirements
hass[15005]: if not pkg_util.install_package(req, target=hass.config.path('deps')):
hass[15005]: File "/srv/homeassistant/lib/python3.4/site-packages/homeassistant/util/package.py", line 25, in install_package
hass[15005]: if check_package_exists(package, target):
hass[15005]: File "/srv/homeassistant/lib/python3.4/site-packages/homeassistant/util/package.py", line 49, in check_package_exists
hass[15005]: req = pkg_resources.Requirement.parse(package)
hass[15005]: AttributeError: 'module' object has no attribute 'Requirement'
systemd[1]: home-assistant@homeassistant.service: main process exited, code=exited, status=1/FAILURE
systemd[1]: Unit home-assistant@homeassistant.service entered failed state.
This is a known error that can be caused by setuptools and can be solved by uninstalling and re-installing the setuptools package.
This can be done with the following commands:
$ sudo su -s /bin/bash homeassistant
$ source /srv/homeassistant/bin/activate
$ pip3 uninstall setuptools
$ pip3 install setuptools
After reinstalling setuptools try starting Home Assistant again:
$ sudo systemctl restart home-assistant.service
Home Assistant is initializing and taking a long time
If the log file looks like this:
hass[10065]: INFO:homeassistant.core:Bus:Handling <Event component_loaded[L]: component=introduction>
hass[10065]: INFO:homeassistant.core:Bus:Handling <Event component_loaded[L]: component=recorder>
hass[10065]: INFO:homeassistant.util.package:Attempting install of netdisco==0.7.5
hass[10065]: INFO:homeassistant.core:Bus:Handling <Event component_loaded[L]: component=discovery>
rsyslogd-2007: action 'action 17' suspended, next retry is Sun Nov 6 00:29:19 2016 [try http://www.rsyslog.com/e/2007 ]
hass[10065]: INFO:homeassistant.util.package:Attempting install of astral==1.2
hass[10065]: INFO:homeassistant.core:Bus:Handling <Event state_changed[L]: old_state=None, entity_id=sun.sun, new_state=<state sun.sun=below_horizon; next_setting=2016-11-06T21:47:21+00:00, azimuth=0, elevation=0, friendly_name=Sun, next_rising=2016-11-06T11:34:20+00:00 @ 2016-11-05T20:29:05.205672-04:00>>
hass[10065]: INFO:homeassistant.core:Bus:Handling <Event component_loaded[L]: component=sun>
hass[10065]: INFO:homeassistant.util.package:Attempting install of aiohttp_cors==0.4.0
Home assistant is just taking a long time installing the dependencies needed to run. It will eventually start but you need to wait until all dependencies are installed you can follow along with the following command:
tail /var/log/syslog -n 100 -f
Wait until see log output similar to this:
hass[10065]: INFO:homeassistant.core:Bus:Handling <Event component_loaded[L]: component=history>
hass[10065]: INFO:homeassistant.core:Starting Home Assistant core loop
hass[10065]: INFO:homeassistant.core:Starting Home Assistant
hass[10065]: INFO:homeassistant.core:Bus:Handling <Event service_registered[L]: domain=homeassistant, service=stop>
hass[10065]: INFO:homeassistant.core:Bus:Handling <Event service_registered[L]: domain=homeassistant, service=restart>
hass[10065]: INFO:homeassistant.core:Bus:Handling <Event homeassistant_start[L]>
Then try to reload the page in the browser and it should load.
A Z-Wave slave node is not getting included into your network
A Z-Wave slave node can sometimes have problems joining a new Z-Wave network if its already part of an old network.
To reset a slave node do the the following:
- Unplug the Z-Stick
- Hold action button for 3 seconds
- The Z-Stick now goes into exclusion mode as indicated by a pulsing orange light
- Now press the include button on your Z-Wave device
- If the device is successfully reset the Z-Stick LED will light up in a solid orange light
- Press the action button again on the Z-Stick to leave exclusion mode and try inclusion again

1 Comment
How to access your Raspberry Pi Home Assistant Smart Home Hub from outside your home | Raspberry Pi HQ · November 12, 2016 at 3:37 pm
[…] the How to: Create a Z-Wave Smart Home hub using a Raspberry Pi post we walked through how to setup the Raspberry Pi as a Smart Home hub that will enable you to […]
Comments are closed.